Setting up a Spark cluster within M3 cluster
Installation
Different Spark version may have different version requirements for Python and Java. We will use Spark 3.5, Python 3.10 (JupyterLab Environment), and Java 8 (default in M3). There are 2 main things that we need to set up:
- Miniconda
Conda can be installed using the conda-install module from M3. The JupyterLab environment currently uses Python 3.10, meeting the prerequisite for Spark 3.5. This environment will also be utilized for running a notebook in STRUDEL. For those interested in customizing their own conda environment on M3, detailed instructions can be found in this page.
module load conda-install
conda-install
- Spark Engine
Since M3 does not include a built-in module for Spark, we need to download and unzip it. Other versions can be found here
# Spark 3.5.0
wget https://dlcdn.apache.org/spark/spark-3.5.0/spark-3.5.0-bin-hadoop3.tgz
tar xzfv spark-3.5.0-bin-hadoop3.tgz
rm -rf spark-3.5.0-bin-hadoop3.tgz
Getting the cluster running
Requesting nodes from M3
We can refer to the M3 chapter to request an interactive session. E.g:
# Interactive session with: 12 cpus, 1 hour of time, 4 nodes, 8gb memory per node on m3i partion
smux new-session --jobname=testing_spark --ntasks=4 --time=0-01:00:00 --partition=m3i --mem=8GB --nodes=4 --cpuspertask=4
Setting up worker
- Write requested nodes name to the config file within spark
# Get names of all nodes
# Read from 2nd node to the last node (as the 1st node is the master node)
# Write it to the config file workers within spark engine
scontrol show hostnames | sed -n '2,$p' > /path/to/spark-3.5.0-bin-hadoop3/conf/workers
Starting spark cluster
- Start the cluster
source /path/to/spark-3.5.0-bin-hadoop3/sbin/start-all.sh
Connecting Jupyter Lab (STRUDEL) to the Cluster
Spark’s shell offers a straightforward approach to grasp the API and serves as a robust tool for interactive data analysis. However, incorporating a user-friendly interface facilitates more intricate operations and functionalities. In this context, we'll utilise Jupyter Lab, which is made available through STRUDEL.
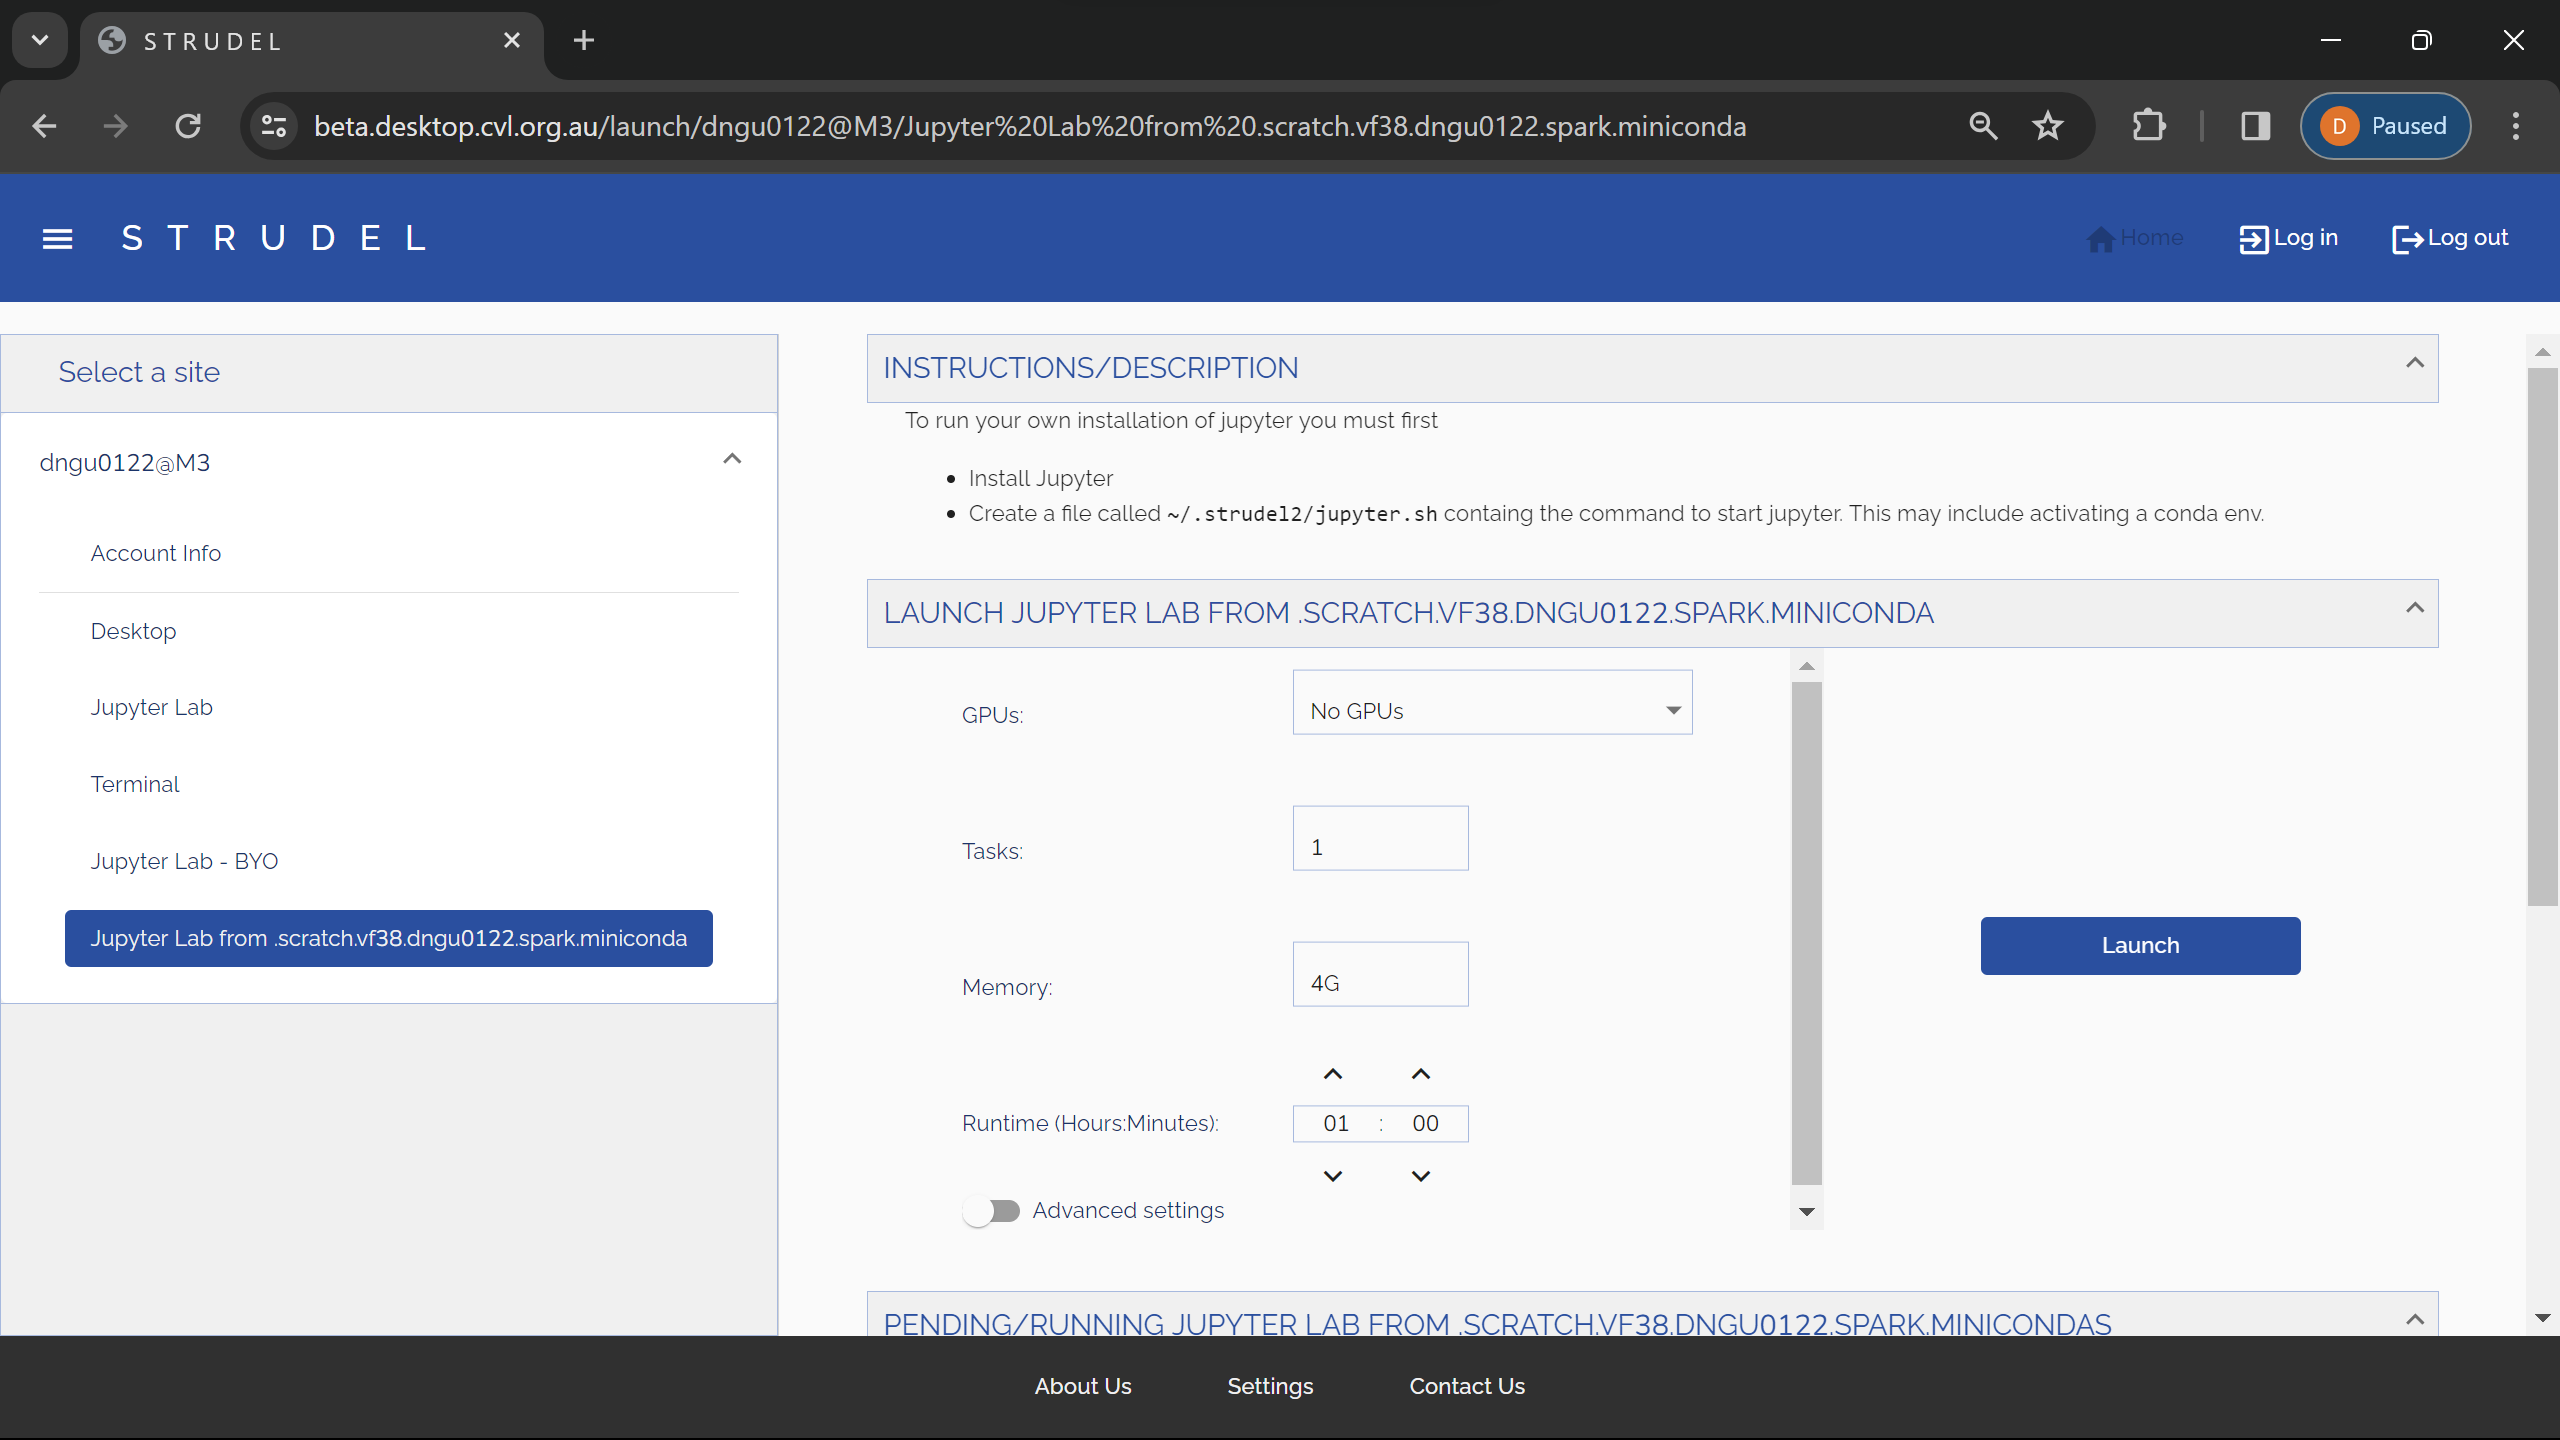
Requesting a notebook through STRUDEL
When installing miniconda in M3, there will be a built-in environment named jupyterlab. This environment will also be automatically added into STRUDEL and we can launch a JupyterLab session from this environment.
Exporting environments variables
import sys
import os

# Specify paths, which will be set as environment variables and read by the Spark engine
SPARK_HOME = "/path/to/spark-3.5.0-bin-hadoop3"
os.environ["SPARK_HOME"] = SPARK_HOME
PREV_PATH = os.environ["PATH"]
os.environ["PATH"] = f"{SPARK_HOME}/bin:{PREV_PATH}"

# Specify which Python to be used by the driver and workers
os.environ["PYSPARK_PYTHON"] = sys.executable

# Add pyspark to the PYTHONPATH
PYSPARK_HOME=f"{SPARK_HOME}/python"
sys.path.append(PYSPARK_HOME)

# Different Spark version will have different py4j version
sys.path.append(f"{PYSPARK_HOME}/lib/py4j-0.10.9.7-src.zip")
Connecting to the Spark master
import pyspark
from pyspark.sql import SparkSession

# Initilize a Spark context from the Spark Cluster
spark = SparkSession \
    .builder \
    .master("spark://{master_node}.massive.org.au:7077") \
    .appName("test") \
    .config("spark.workers.show", "True") \
    .getOrCreate()
SSH Tunnel SparkUI to Localhost
We can use ssh tunneling to forward the Spark UI of the engine to our local machine, the UI will be available as a web application at http://localhost:4040.
# The jupyterlab node will be the node that the jupyter lab is currently running on
ssh -L 4040:{jupyterlab_node}.massive.org.au:4040 {username}@m3.massive.org.au
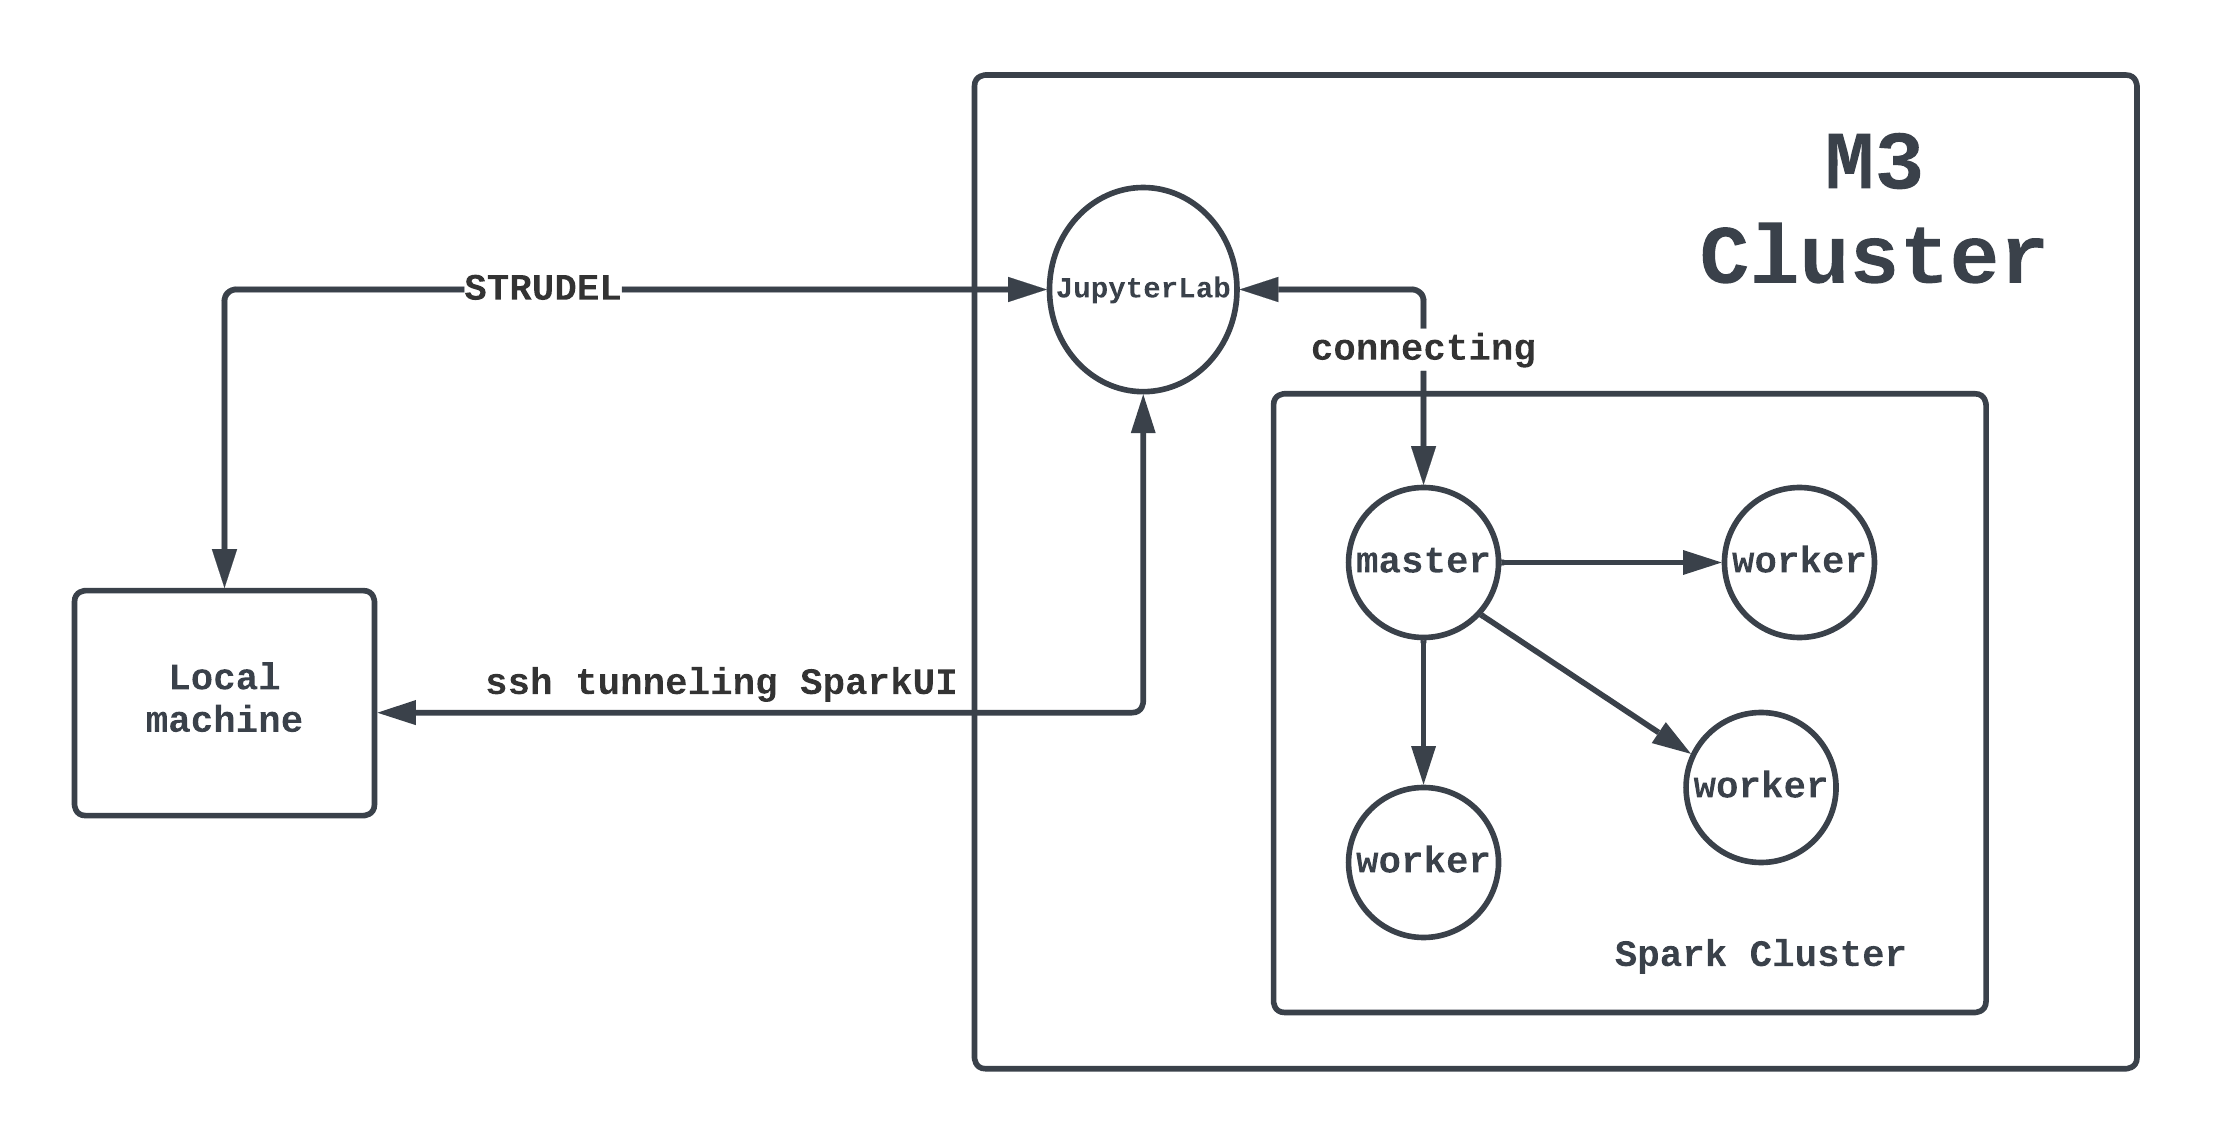
Overview of what we have just done
The overall architecture can be demonstrated through this diagram:
- Each circle is a computing node of M3.
- A mini-cluster managed by Spark is running inside the big M3 cluster.
- We also have a notebook (from STRUDEL) connecting to the master node of the Spark cluster.